> ## Documentation Index
> Fetch the complete documentation index at: https://pitchprint.com/llms.txt
> Use this file to discover all available pages before exploring further.
# Template Color Module
> Let customers swap the product template image, such as T-shirt colours, from a colour palette inside the editor
 This module is targeted at Template based designs.
A template based design is one in which an image is required as a product template to give a visual effect of the actual product to the customer during the design process. For example, TShirts, Mugs, Phone Casing etc are all template based designs because they require a product template unto which the design is placed, but not printed in the final output. A business card is NOT a template based design since we really don’t need an actual business card to be displayed in the design window.
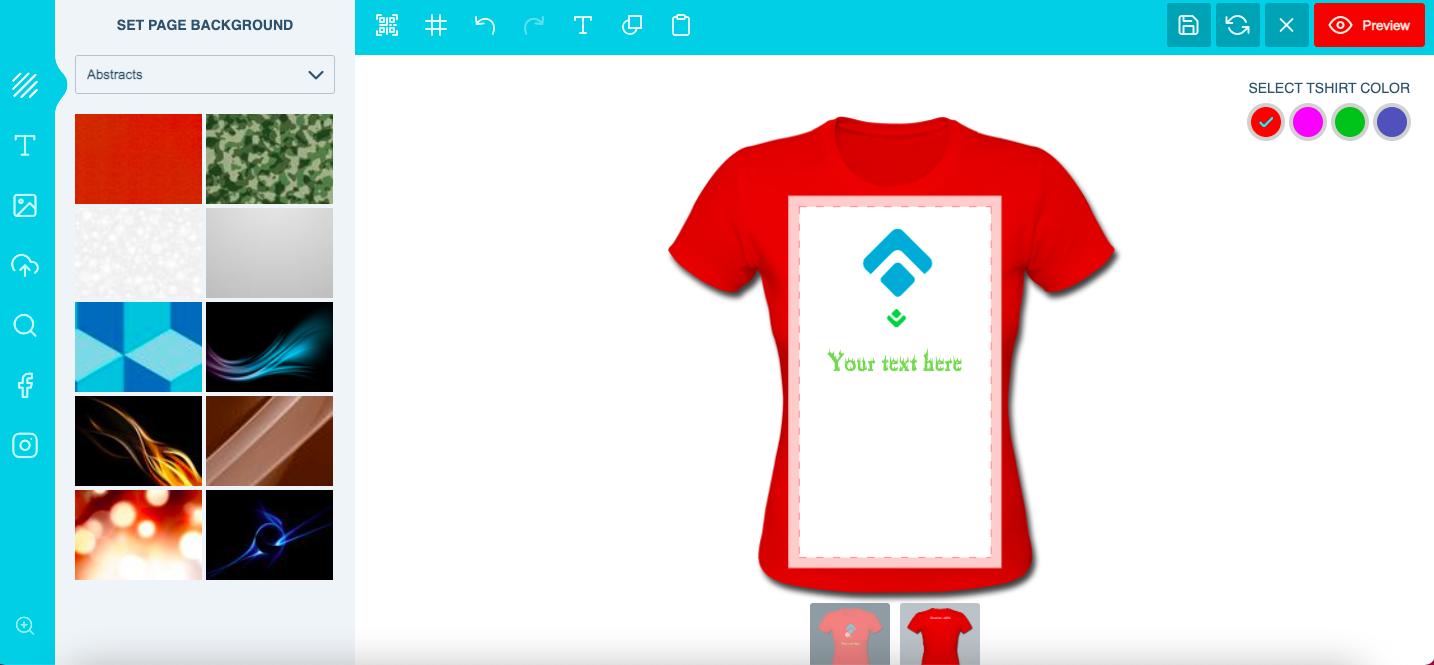
This module basically allows users to change the template image at design time without going outside of the editor. So for this example, we will consider a TShirt design where you will like the customer to try out different T-Shirt colors from your store to see which is best for their design by simply clicking on a color pallet.
Here is how the final module will appear in the designer:
This module is targeted at Template based designs.
A template based design is one in which an image is required as a product template to give a visual effect of the actual product to the customer during the design process. For example, TShirts, Mugs, Phone Casing etc are all template based designs because they require a product template unto which the design is placed, but not printed in the final output. A business card is NOT a template based design since we really don’t need an actual business card to be displayed in the design window.
This module basically allows users to change the template image at design time without going outside of the editor. So for this example, we will consider a TShirt design where you will like the customer to try out different T-Shirt colors from your store to see which is best for their design by simply clicking on a color pallet.
Here is how the final module will appear in the designer:
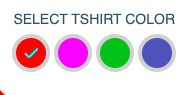 And how it's positioned within the designer:
How to configure this module:
Create your template based design in the [Admin Area](https://pitchprint.net/admin/login).
Click the Configure Design icon. In the popup window, click the Modules Tab.
Enable Template Colors:
And how it's positioned within the designer:
How to configure this module:
Create your template based design in the [Admin Area](https://pitchprint.net/admin/login).
Click the Configure Design icon. In the popup window, click the Modules Tab.
Enable Template Colors:
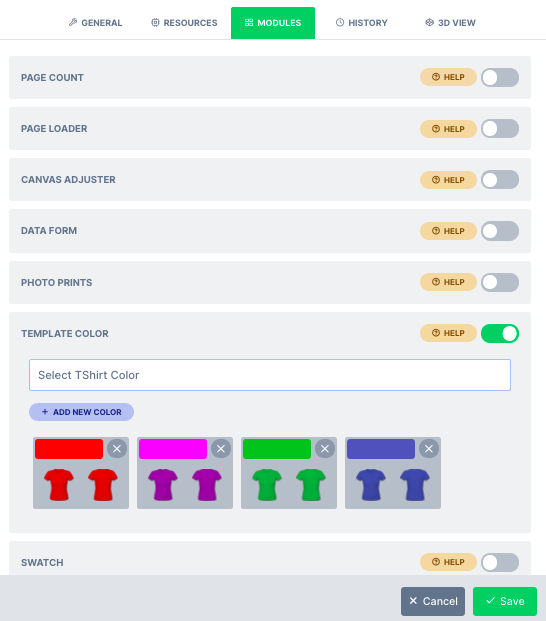 You'll see there is a Title text box, and a '+ Add New' button. If it doesn't show this, it means your particular design is not template based.
Type in a title for the Module.
To create a new color simply click '+ Add New' button. In the variant, you have a color rectangle default to red and a number image icons, representing the number of pages in your design.
Click the red colored rectangle to set the color for this variant.
You'll see there is a Title text box, and a '+ Add New' button. If it doesn't show this, it means your particular design is not template based.
Type in a title for the Module.
To create a new color simply click '+ Add New' button. In the variant, you have a color rectangle default to red and a number image icons, representing the number of pages in your design.
Click the red colored rectangle to set the color for this variant.
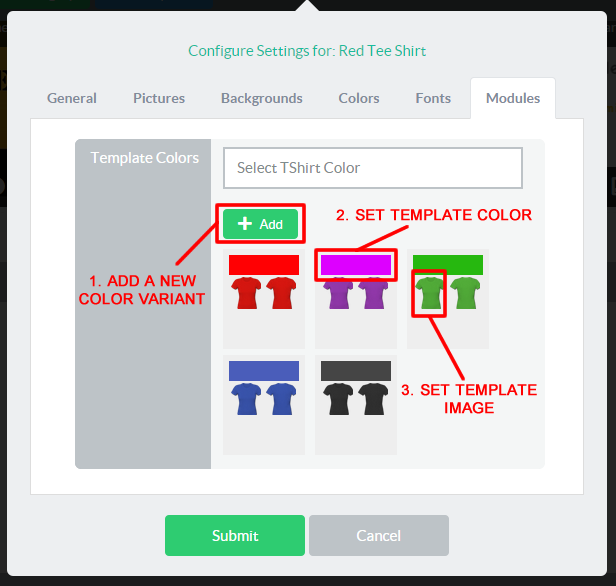 You should now click each of the image icons to set the template image that will appear for that color variant.
You can equally upload your picture from that panel and immediately assign it to the module.
You can add as many color variants as desired and once finished, click the submit button to save.
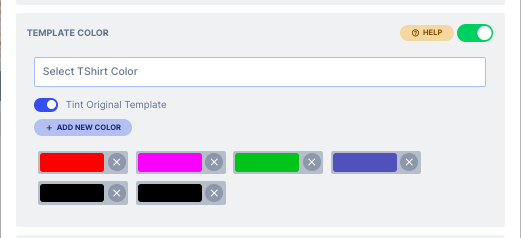
We recently added a new feature which allows you to enable **tint original template**, If enabled, upload the white template into the design and save it. You can then select the colors you would like to use in the template color module. Simply click the **add new color** button to add additional colors. Please refer to the image below for reference. These colors will then be available for the user to choose from. This works the same as the setup above, but saves the admin time by removing the need to upload a separate shirt template for each color.
You should now click each of the image icons to set the template image that will appear for that color variant.
You can equally upload your picture from that panel and immediately assign it to the module.
You can add as many color variants as desired and once finished, click the submit button to save.
We recently added a new feature which allows you to enable **tint original template**, If enabled, upload the white template into the design and save it. You can then select the colors you would like to use in the template color module. Simply click the **add new color** button to add additional colors. Please refer to the image below for reference. These colors will then be available for the user to choose from. This works the same as the setup above, but saves the admin time by removing the need to upload a separate shirt template for each color.
 You have finished, check your store and the module should appear in the designer for that product.
An example product can be seen here: [hoodie template colour demo](https://wp.demo.pitchprint.io/product/hoodie-template-color-module/)
## Related articles
Learn what template-based designs are and how template images are swapped in the editor.
Let customers switch a design's color theme, background and preview within the editor.
Create five-color complementary themes customers can sample to restyle a design.
Understand PitchPrint's color system, including Hex, CMYK and SPOT values.
This documentation is built and hosted on [Mintlify](https://mintlify.com), a developer documentation platform.
You have finished, check your store and the module should appear in the designer for that product.
An example product can be seen here: [hoodie template colour demo](https://wp.demo.pitchprint.io/product/hoodie-template-color-module/)
## Related articles
Learn what template-based designs are and how template images are swapped in the editor.
Let customers switch a design's color theme, background and preview within the editor.
Create five-color complementary themes customers can sample to restyle a design.
Understand PitchPrint's color system, including Hex, CMYK and SPOT values.
This documentation is built and hosted on [Mintlify](https://mintlify.com), a developer documentation platform.