> ## Documentation Index
> Fetch the complete documentation index at: https://pitchprint.com/llms.txt
> Use this file to discover all available pages before exploring further.
# How to update design with customer data
> Label text items with values such as email or firstname so a signed-in customer's cart details fill the design automatically.
When used in some cart frameworks: OpenCart, WordPress and PrestaShop, it plays nice to have the customer's data reflected in the design once they are signed in.
So something like a customer's name can be reflected on a business card design when it loads without them having to do anything yet. The app will fetch the data from the underlying cart framework and update the design to reflect these values. The following are values being watched:
* Email
* Telephone
* Firstname
* Lastname
* Name
* Address
This is done automatically but the admin needs to link these values to text elements placed on the design canvas. To do this:
Load your design in edit mode or create a new design
Select a text item you will like to link on the canvas
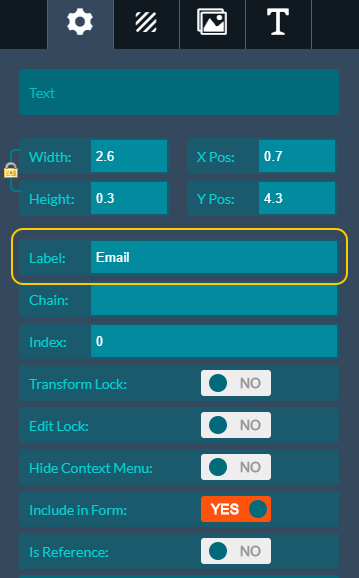
Open the Admin Tab and ***Label*** that item any of the above listed values: email or telephone... as shown in the image below:
 Save your design and check the result on your store front by logging in as a customer and try edit the design. The email text should reflect your (customer's) actual email address.
The **"Name"** is a combination of both **firstname + lastname** to form a full name
## Related articles
Add a quick-edit form that lets customers customize design elements without clicking around the canvas.
Let customers mass-customize a design by uploading data from Excel or CSV files.
Set up a quick-fill form that appears as soon as the app loads for faster edits.
Show the canvas alone with a compact customization form near the add-to-cart button.
This documentation is built and hosted on [Mintlify](https://mintlify.com), a developer documentation platform.
Save your design and check the result on your store front by logging in as a customer and try edit the design. The email text should reflect your (customer's) actual email address.
The **"Name"** is a combination of both **firstname + lastname** to form a full name
## Related articles
Add a quick-edit form that lets customers customize design elements without clicking around the canvas.
Let customers mass-customize a design by uploading data from Excel or CSV files.
Set up a quick-fill form that appears as soon as the app loads for faster edits.
Show the canvas alone with a compact customization form near the add-to-cart button.
This documentation is built and hosted on [Mintlify](https://mintlify.com), a developer documentation platform.