> ## Documentation Index
> Fetch the complete documentation index at: https://pitchprint.com/llms.txt
> Use this file to discover all available pages before exploring further.
# HelpTip Bubbles
> Add hover tooltips to your own layout elements with the data-tip and anchor HTML attributes.
PitchPrint application has an inbuilt help-tip bubble that shows on certain UI elements when users mouse over them. An example is on the Submit button:
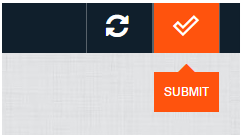 You can add this to your UI elements by following these steps:
Log unto the layout section: [ttps://pitchprint.net/admin/layouts](https://pitchprint.net/admin/layouts)
Select your layout and search for the element you want the help-tip to appear on.
Add the following html attribute to that element:
data-tip="Sample Tip Message" anchor="b"
Save the layout and load your product page, mouse over the element and see it appears.
* data-tip attribute is the message that will appear.
* The anchor is set to b. You can set it to l = left, t = top, b = bottom, r = right. It simply defines the orientation of the help-tip.
This documentation is built and hosted on [Mintlify](https://mintlify.com), a developer documentation platform.
You can add this to your UI elements by following these steps:
Log unto the layout section: [ttps://pitchprint.net/admin/layouts](https://pitchprint.net/admin/layouts)
Select your layout and search for the element you want the help-tip to appear on.
Add the following html attribute to that element:
data-tip="Sample Tip Message" anchor="b"
Save the layout and load your product page, mouse over the element and see it appears.
* data-tip attribute is the message that will appear.
* The anchor is set to b. You can set it to l = left, t = top, b = bottom, r = right. It simply defines the orientation of the help-tip.
This documentation is built and hosted on [Mintlify](https://mintlify.com), a developer documentation platform.