> ## Documentation Index
> Fetch the complete documentation index at: https://pitchprint.com/llms.txt
> Use this file to discover all available pages before exploring further.
# Canvas Adjuster Module
> Let customers resize the canvas using your preset sizes or their own values, with optional aspect-ratio lock and product-page size syncing.
export const ReleaseLink = ({release}) => {
const BLOG_RELEASE_BASE = "https://blog.pitchprint.com";
const label = (release || "").toUpperCase();
const href = `${BLOG_RELEASE_BASE}/release-${release}`;
return
🚀 Shipped in Release {label}
;
};
 This module allows your customers to adjust the canvas dimension before or during designing, custom dimensions can be given or have them pick from a list of preset values you created for the particular product.
### How to Enable and Configure Canvas Adjuster on a Design
To enable this feature, navigate to your [designs page](https://admin.pitchprint.io/designs), simply click the Configure button on the design you like to assign this to. Then navigate to the Modules Tab. There you will find the Canvas Adjuster module. Click to enable it and the configuration panel shows up as shown below:
This module allows your customers to adjust the canvas dimension before or during designing, custom dimensions can be given or have them pick from a list of preset values you created for the particular product.
### How to Enable and Configure Canvas Adjuster on a Design
To enable this feature, navigate to your [designs page](https://admin.pitchprint.io/designs), simply click the Configure button on the design you like to assign this to. Then navigate to the Modules Tab. There you will find the Canvas Adjuster module. Click to enable it and the configuration panel shows up as shown below:
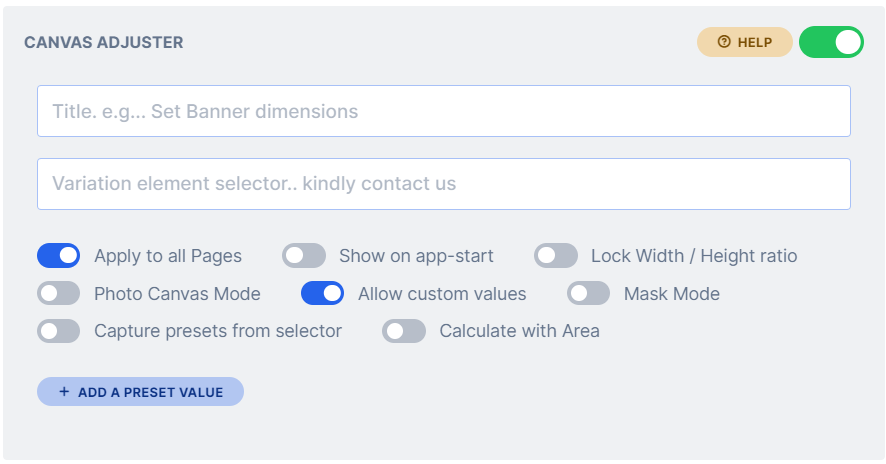 The configuration options are as follows:
A title that users get to see on the panel. For example “*Set banner dimensions*“
An automated way of syncing the size selector in your product page with the canvas adjuster module. Following the example link above, the selected size in the product page is automatically used by the design app without any additional integration. If the size is changed in the app, the product page selector is auto-updated. It is a two way sync and if you have a linked pricing, the price is also updated.
The configuration options are as follows:
A title that users get to see on the panel. For example “*Set banner dimensions*“
An automated way of syncing the size selector in your product page with the canvas adjuster module. Following the example link above, the selected size in the product page is automatically used by the design app without any additional integration. If the size is changed in the app, the product page selector is auto-updated. It is a two way sync and if you have a linked pricing, the price is also updated.
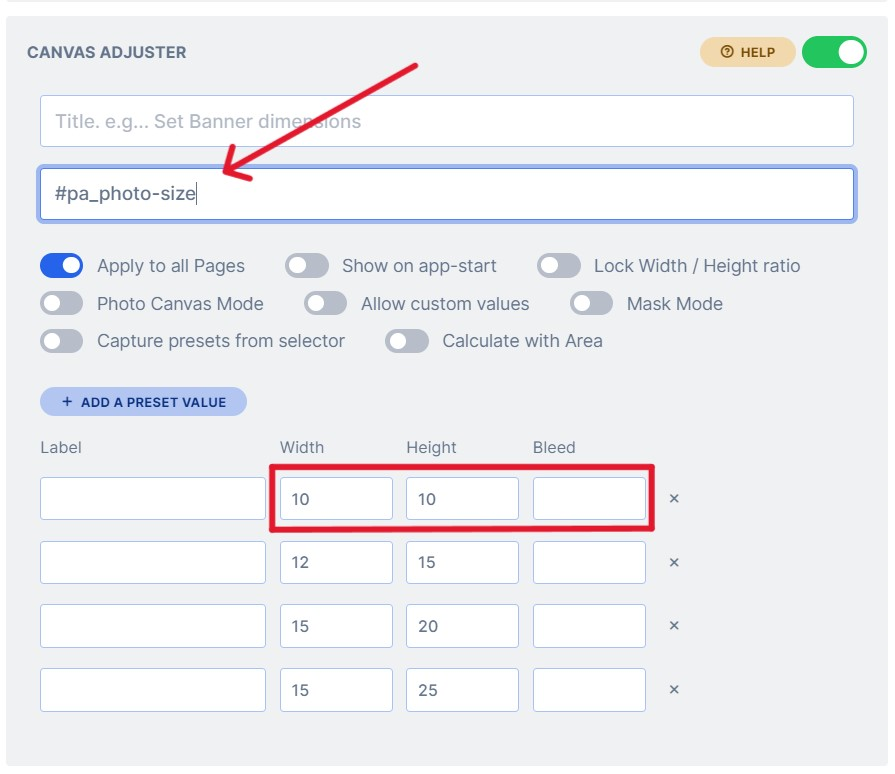 The value to be placed here is the jQuery element unique id or class for the size selector in your product page. This changes from theme to theme and differs even on framework. Should you need help in accessing the element, do send us a ticket with a direct link to your product page.
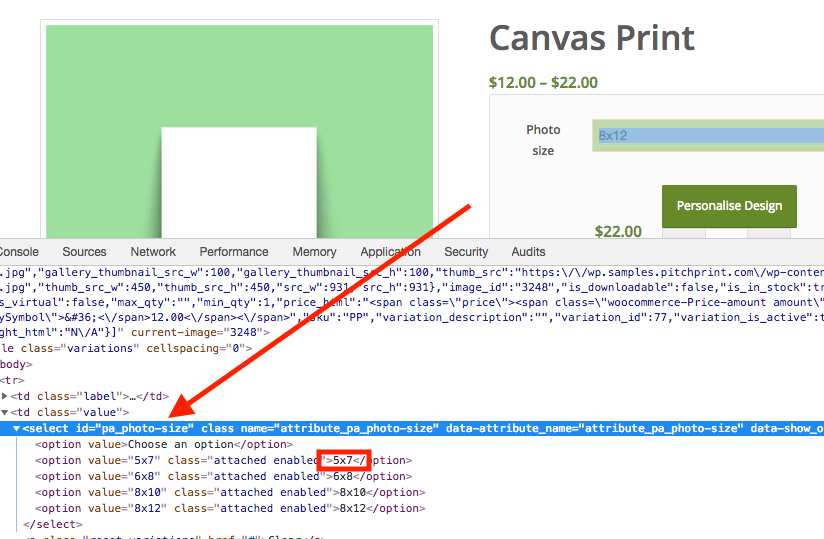 When enabled, the values entered by the customer are locked in proportion based on the default page dimension of the initial design.
When enabled, the dimensions applied to one page reflect across all the pages when the customer changes the dimension.
Gives your users the ability to enter their own custom values instead of choosing from your preset list.
Adds a preset value to the list. In the front designer, your customers get to pick from this list. To delete any, click on the red button with the cross against the row. This value is set in the design’s default value. You can enter as many values or none.
If no preset value is provided, the preset list is not shown.
An extension of the Photo mode feature. In the default Photo mode, the canvas is adjusted to fit the aspect ratio of the main photo. With mask mode enabled, the photo is masked to fit the canvas area and the user is given tools to zoom and position the photo as desired.
This works like a Photo Print feature where customers can order photo prints in standard sizes by placing their photos on the canvas and have it fit that dimension. When they choose a different dimension, the photo will adjust to fit the new size.
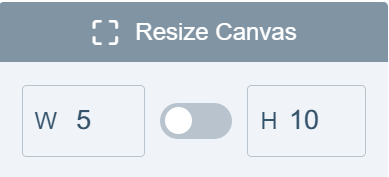
Docks the custom size panel on the top of the window for easy modification of canvas sizes as shown:
When enabled, the values entered by the customer are locked in proportion based on the default page dimension of the initial design.
When enabled, the dimensions applied to one page reflect across all the pages when the customer changes the dimension.
Gives your users the ability to enter their own custom values instead of choosing from your preset list.
Adds a preset value to the list. In the front designer, your customers get to pick from this list. To delete any, click on the red button with the cross against the row. This value is set in the design’s default value. You can enter as many values or none.
If no preset value is provided, the preset list is not shown.
An extension of the Photo mode feature. In the default Photo mode, the canvas is adjusted to fit the aspect ratio of the main photo. With mask mode enabled, the photo is masked to fit the canvas area and the user is given tools to zoom and position the photo as desired.
This works like a Photo Print feature where customers can order photo prints in standard sizes by placing their photos on the canvas and have it fit that dimension. When they choose a different dimension, the photo will adjust to fit the new size.
Docks the custom size panel on the top of the window for easy modification of canvas sizes as shown:
 Allows users to create a canvas photo by adjusting the canvas size to the ratio of their uploaded photos. It is suited for plain canvases without any item, where users can simply drag their photos onto the canvas and the canvas will shrink or expand to the dimension of the photo placed on it.
When enabled, the designer will open with the dimensions selected by the customer on the product page.
A sample can be found on the following link [banner Canvas Adjuster demo](https://wp.demo.pitchprint.io/product/banner-canvas-adjuster/)
When the Photo Canvas option is selected, the custom size option is disabled for that design since canvas ratio is strictly based on the uploaded photo.
## Related articles
Set up canvas-based pricing variations for the Canvas Adjuster in a WooCommerce store.
Configure canvas-based pricing options for the Canvas Adjuster in an OpenCart store.
This documentation is built and hosted on [Mintlify](https://mintlify.com), a developer documentation platform.
Allows users to create a canvas photo by adjusting the canvas size to the ratio of their uploaded photos. It is suited for plain canvases without any item, where users can simply drag their photos onto the canvas and the canvas will shrink or expand to the dimension of the photo placed on it.
When enabled, the designer will open with the dimensions selected by the customer on the product page.
A sample can be found on the following link [banner Canvas Adjuster demo](https://wp.demo.pitchprint.io/product/banner-canvas-adjuster/)
When the Photo Canvas option is selected, the custom size option is disabled for that design since canvas ratio is strictly based on the uploaded photo.
## Related articles
Set up canvas-based pricing variations for the Canvas Adjuster in a WooCommerce store.
Configure canvas-based pricing options for the Canvas Adjuster in an OpenCart store.
This documentation is built and hosted on [Mintlify](https://mintlify.com), a developer documentation platform.