> ## Documentation Index
> Fetch the complete documentation index at: https://pitchprint.com/llms.txt
> Use this file to discover all available pages before exploring further.
# 3D UV Mapping
> How to UV map an OBJ model against the PitchPrint template so the customer's design and texture land on the right areas of the mesh
UV Mapping is one of the most important processes in regard to 3D modelling, before uploading the model to PitchPrint 3D Studio it is important to ensure that the model is UV Mapped accurately for the design to reflect correctly on the allocated area of a model.
### What is UV Mapping
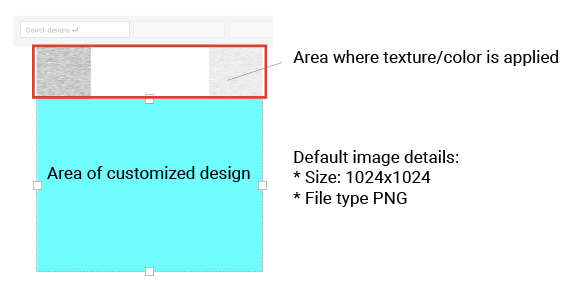
UV mapping is the 3D modelling process of projecting a 2D image to a 3D model's surface for texture mapping. When uploading your own mesh and changing the picture there is an allocated area that is applied to the model according to the layout to PitchPrint default image. \*NB, if the model is not mapped according to PitchPrint default image the design will not display correctly on the model.
The blue area is where the customized work will be placed on the model and the top white blocks is the allocated area for the material or texture that will be applied to the rest of the model. When UV Mapping a model it needs to be placed in the sectioned area as the image shown below.
 ### **Creating a material image to replace the default image**
This image should be a replica of the [PitchPrint default image](https://admin.pitchprint.io/three).
### **Creating a material image to replace the default image**
This image should be a replica of the [PitchPrint default image](https://admin.pitchprint.io/three).
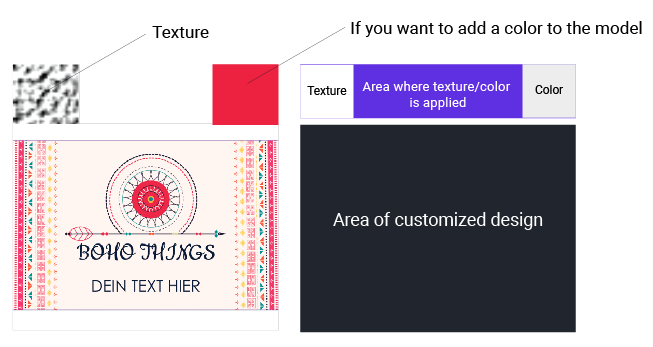 Create a canvas of 1024x1024 in any design software such as Adobe Illustrator, Photoshop etc.
Open the artwork you want to apply to the 3D model in a design program and scale it down to fit the area where the customized design will be placed.
Open the texture image and place it in the texture area
Save file as PNG.
This material image will replace the default image when changing the picture.
### UV Mapping the model
Create a canvas of 1024x1024 in any design software such as Adobe Illustrator, Photoshop etc.
Open the artwork you want to apply to the 3D model in a design program and scale it down to fit the area where the customized design will be placed.
Open the texture image and place it in the texture area
Save file as PNG.
This material image will replace the default image when changing the picture.
### UV Mapping the model
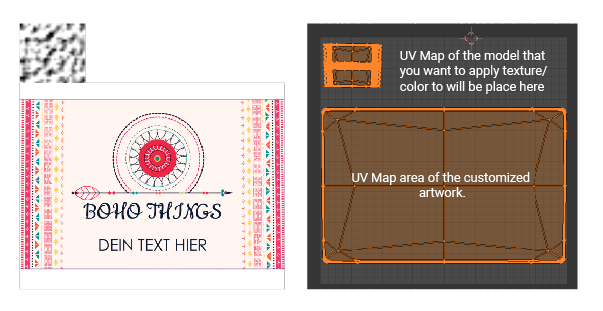 The way the model is UV Mapped is important as the mapping should be identical to the default image template on PitchPrint or the image you created to replace the default image. The 3D model can only be UV Mapped in a 3D design software such as Blender and not on PitchPrint.
### Uploading the model in your PitchPrint store
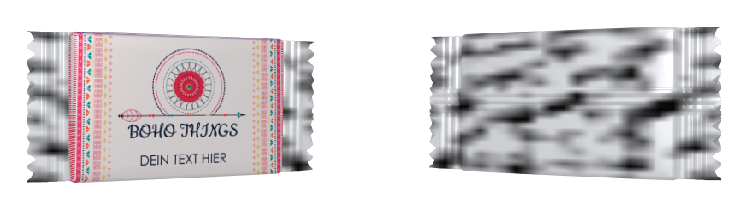
\*NB, the mesh should be exported as a OBJ file, as PitchPrint only supports this file type. Click on upload mesh, in the [3D studio](https://admin.pitchprint.io/three) and upload your model. Click on change picture and select the material image you created the image will display on the model as shown below.
The way the model is UV Mapped is important as the mapping should be identical to the default image template on PitchPrint or the image you created to replace the default image. The 3D model can only be UV Mapped in a 3D design software such as Blender and not on PitchPrint.
### Uploading the model in your PitchPrint store
\*NB, the mesh should be exported as a OBJ file, as PitchPrint only supports this file type. Click on upload mesh, in the [3D studio](https://admin.pitchprint.io/three) and upload your model. Click on change picture and select the material image you created the image will display on the model as shown below.
 ### Configuring the model
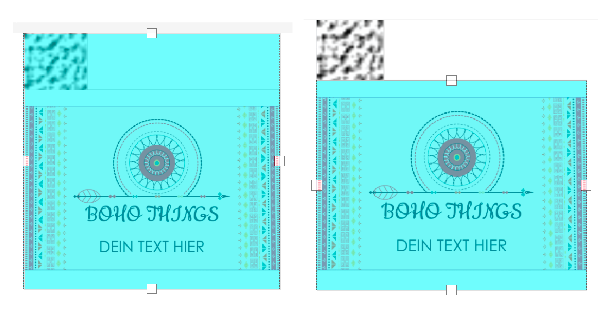
Click on the show configuration button. This helps to set the artwork boundaries to the area of where you want the design to be displayed on the model. The open space(s) will appear on the rest of the model when a different texture or color is applied to the model. You can drag the white square(s) on the configuration boundary inward to set the area you would like your design to fill. The texture will automatically be applied on the rest of the model once you set the artwork boundaries.
### Configuring the model
Click on the show configuration button. This helps to set the artwork boundaries to the area of where you want the design to be displayed on the model. The open space(s) will appear on the rest of the model when a different texture or color is applied to the model. You can drag the white square(s) on the configuration boundary inward to set the area you would like your design to fill. The texture will automatically be applied on the rest of the model once you set the artwork boundaries.
 Once you made the necessary changes select save. On completion you can assign a design to the 3D model. The 3D model will auto rotate allowing you to see the model from different perspectives. You are able to turn this feature off if you want the model to be stationary.
## Related articles
Overview of PitchPrint 3D View, uploading a mesh and assigning designs to a model.
Learn what 3D Studio is and which model file types you can upload.
End-to-end tutorial on creating a 3D model and assigning it to a design.
Build a two-page design and texture for a 3D business card model.
This documentation is built and hosted on [Mintlify](https://mintlify.com), a developer documentation platform.
Once you made the necessary changes select save. On completion you can assign a design to the 3D model. The 3D model will auto rotate allowing you to see the model from different perspectives. You are able to turn this feature off if you want the model to be stationary.
## Related articles
Overview of PitchPrint 3D View, uploading a mesh and assigning designs to a model.
Learn what 3D Studio is and which model file types you can upload.
End-to-end tutorial on creating a 3D model and assigning it to a design.
Build a two-page design and texture for a 3D business card model.
This documentation is built and hosted on [Mintlify](https://mintlify.com), a developer documentation platform.