> ## Documentation Index
> Fetch the complete documentation index at: https://pitchprint.com/llms.txt
> Use this file to discover all available pages before exploring further.
# Introducing the New AI Studio for Admins
> A few months ago, we introduced the AI Tab within the editor on the user side, enabling end users to generate images directly from text prompts.
export const props_0 = undefined
export const author_0 = "Rukaya Davids"
export const date_0 = "3 July 2025"
export const readTime_0 = "2 min read"
{props_0.author_0}
·
{props_0.date_0}
{props_0_0.readTime_0_0 && <>·{props.readTime}}
 A few months ago, we introduced the **AI Tab** within the editor on the user side, enabling end users to generate images directly from text prompts. Since its release, we’ve received an overwhelming number of requests to expand on this functionality and make it more accessible to store owners and administrators.
In response to this feedback, we’re excited to announce the launch of our **AI Studio**—a powerful new feature available within the admin panel. The AI Studio allows administrators to generate high-quality image resources simply by entering descriptive text prompts. This makes it easier than ever to create custom graphics, backgrounds, or product visuals on the fly, without the need for third-party tools or graphic design experience.
This new tool provides added flexibility and creative control, helping you streamline your workflow and enhance the design experience for your customers.
## How to Get Started
To use the AI Studio, log in to your admin account and go to the **AI Studio** section. Click on the **Create New** button to begin.
A few months ago, we introduced the **AI Tab** within the editor on the user side, enabling end users to generate images directly from text prompts. Since its release, we’ve received an overwhelming number of requests to expand on this functionality and make it more accessible to store owners and administrators.
In response to this feedback, we’re excited to announce the launch of our **AI Studio**—a powerful new feature available within the admin panel. The AI Studio allows administrators to generate high-quality image resources simply by entering descriptive text prompts. This makes it easier than ever to create custom graphics, backgrounds, or product visuals on the fly, without the need for third-party tools or graphic design experience.
This new tool provides added flexibility and creative control, helping you streamline your workflow and enhance the design experience for your customers.
## How to Get Started
To use the AI Studio, log in to your admin account and go to the **AI Studio** section. Click on the **Create New** button to begin.
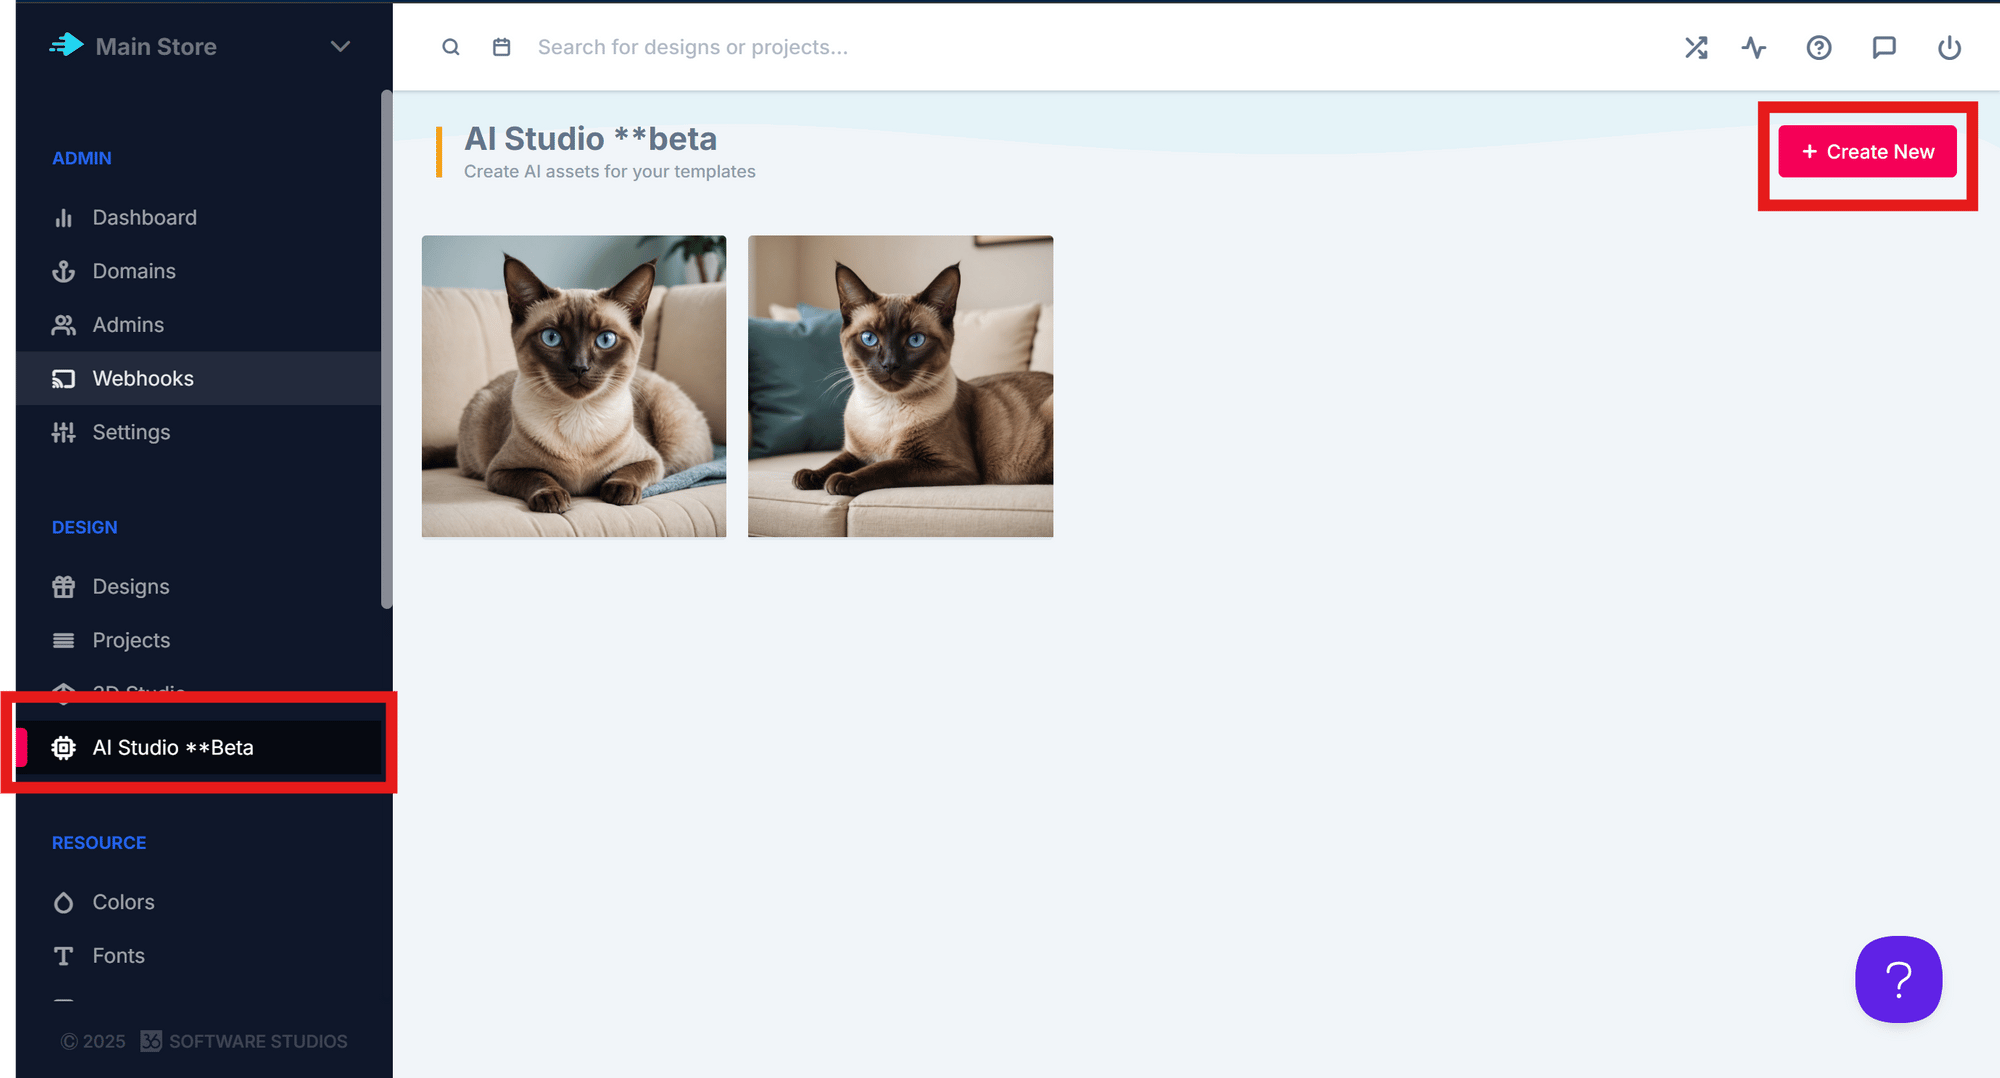 Here’s what the layout looks like:
 ## Steps to Generate an Image
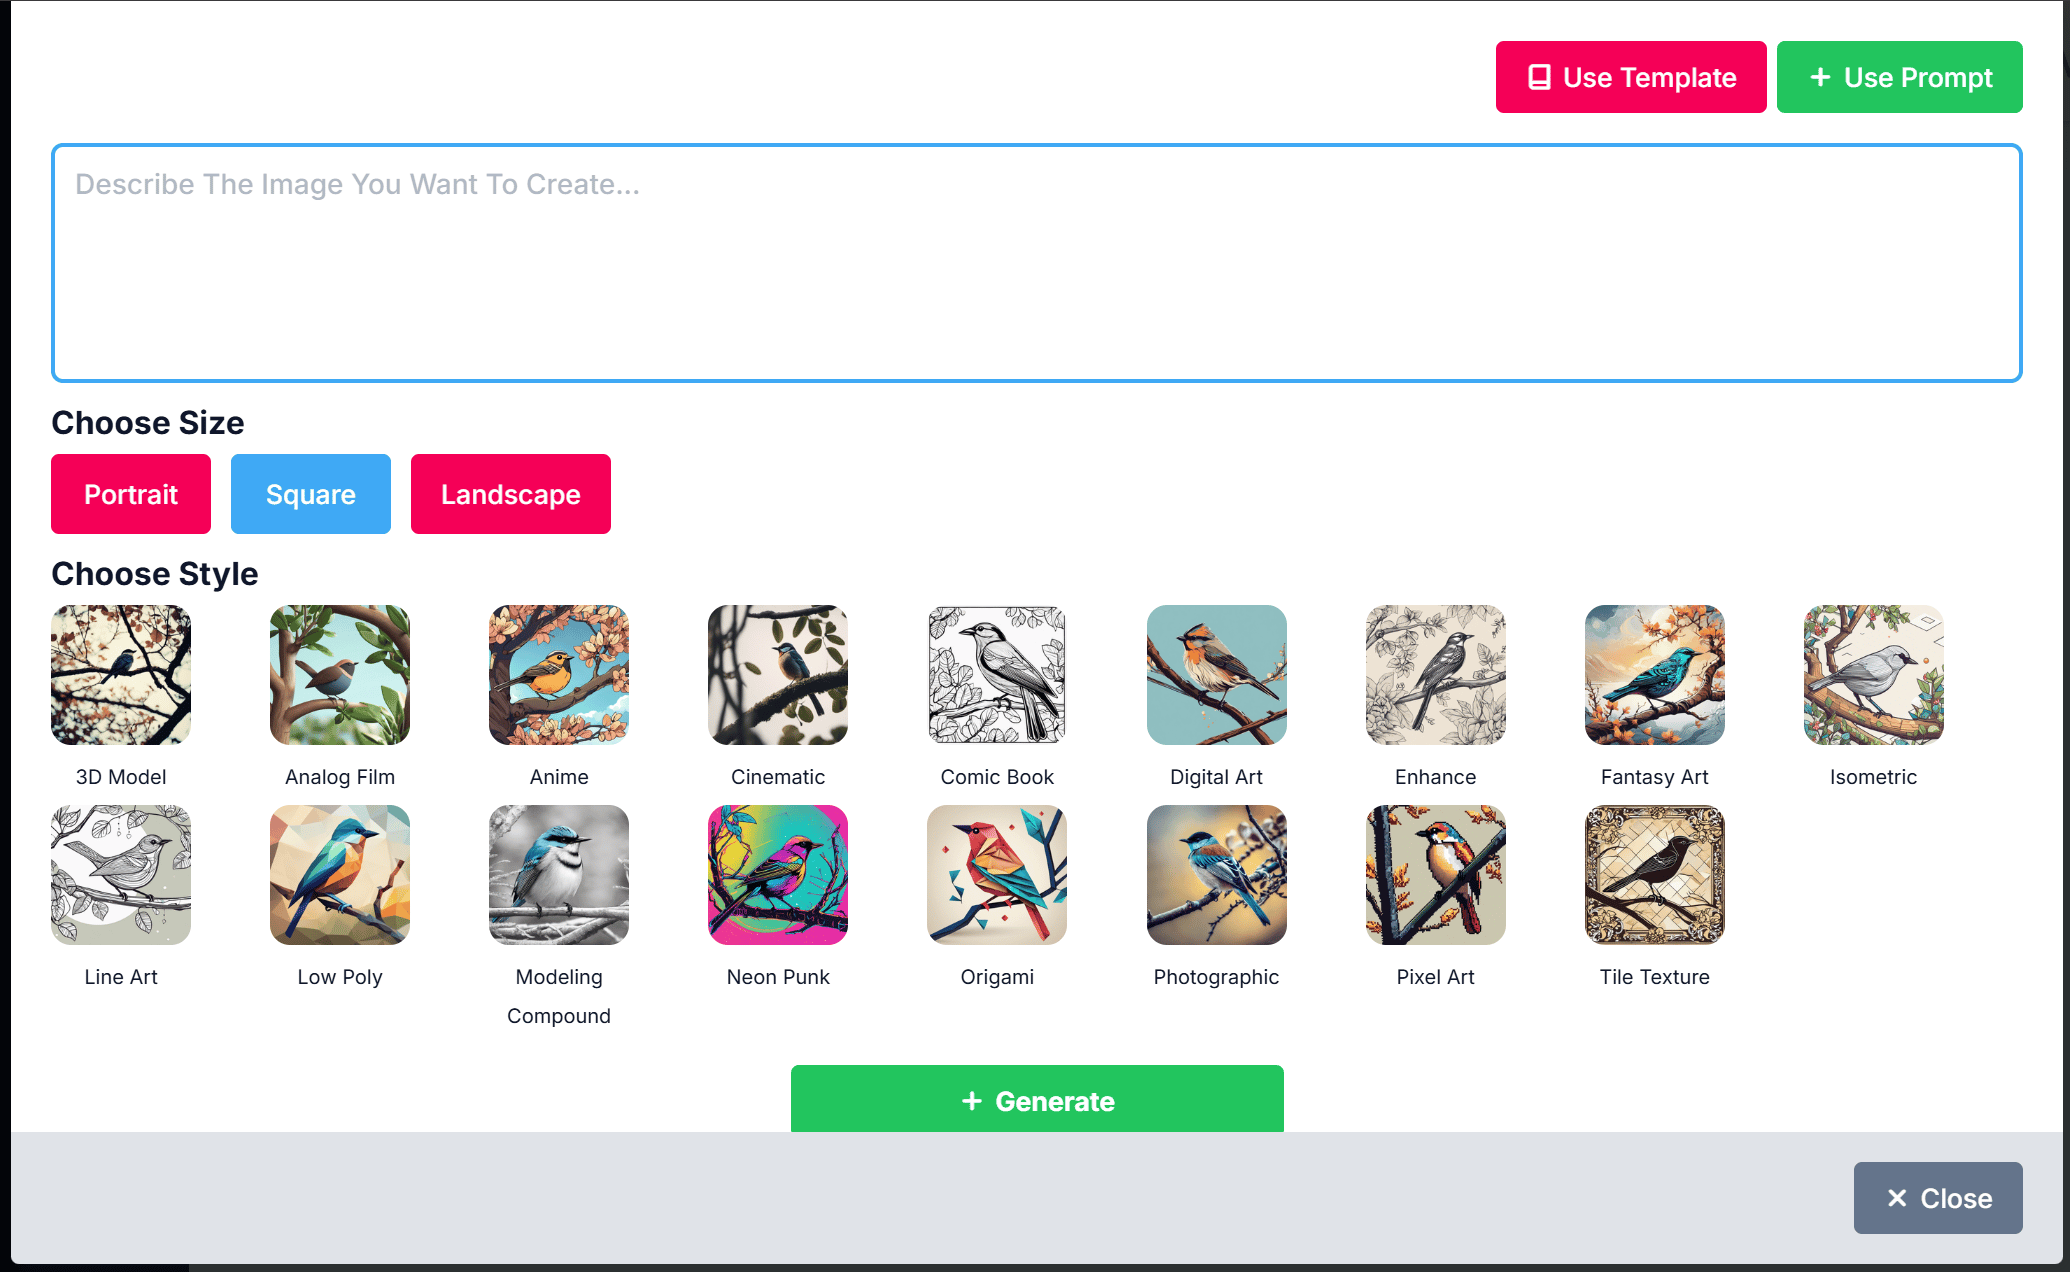
1. **Enter a Text Prompt** – Describe the image you want to create.
2. **Select a Size** – Choose the image dimensions.
3. **Select a Style** – Pick a visual style, then click Generate.
## AI Studio Feature Overview
* **Use Template** – Start with a previously created template as your prompt. This is ideal for reusing or editing existing prompts to streamline your workflow.
* **Use Prompt** – Enter a custom text prompt from scratch to generate a new image tailored to your specific needs.
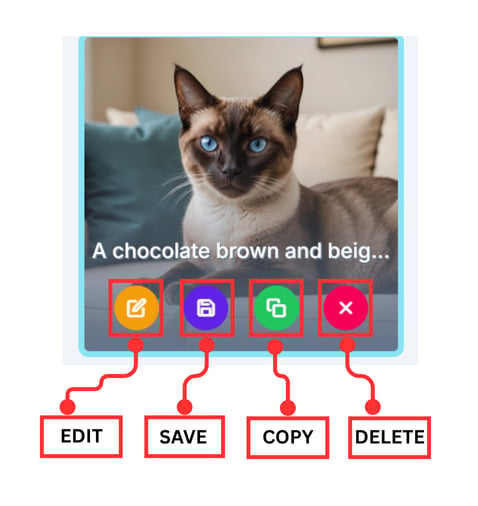
When you hover over an image, the following options will appear. Each feature is explained in detail below:
## Steps to Generate an Image
1. **Enter a Text Prompt** – Describe the image you want to create.
2. **Select a Size** – Choose the image dimensions.
3. **Select a Style** – Pick a visual style, then click Generate.
## AI Studio Feature Overview
* **Use Template** – Start with a previously created template as your prompt. This is ideal for reusing or editing existing prompts to streamline your workflow.
* **Use Prompt** – Enter a custom text prompt from scratch to generate a new image tailored to your specific needs.
When you hover over an image, the following options will appear. Each feature is explained in detail below:
 ## Editing Your Image
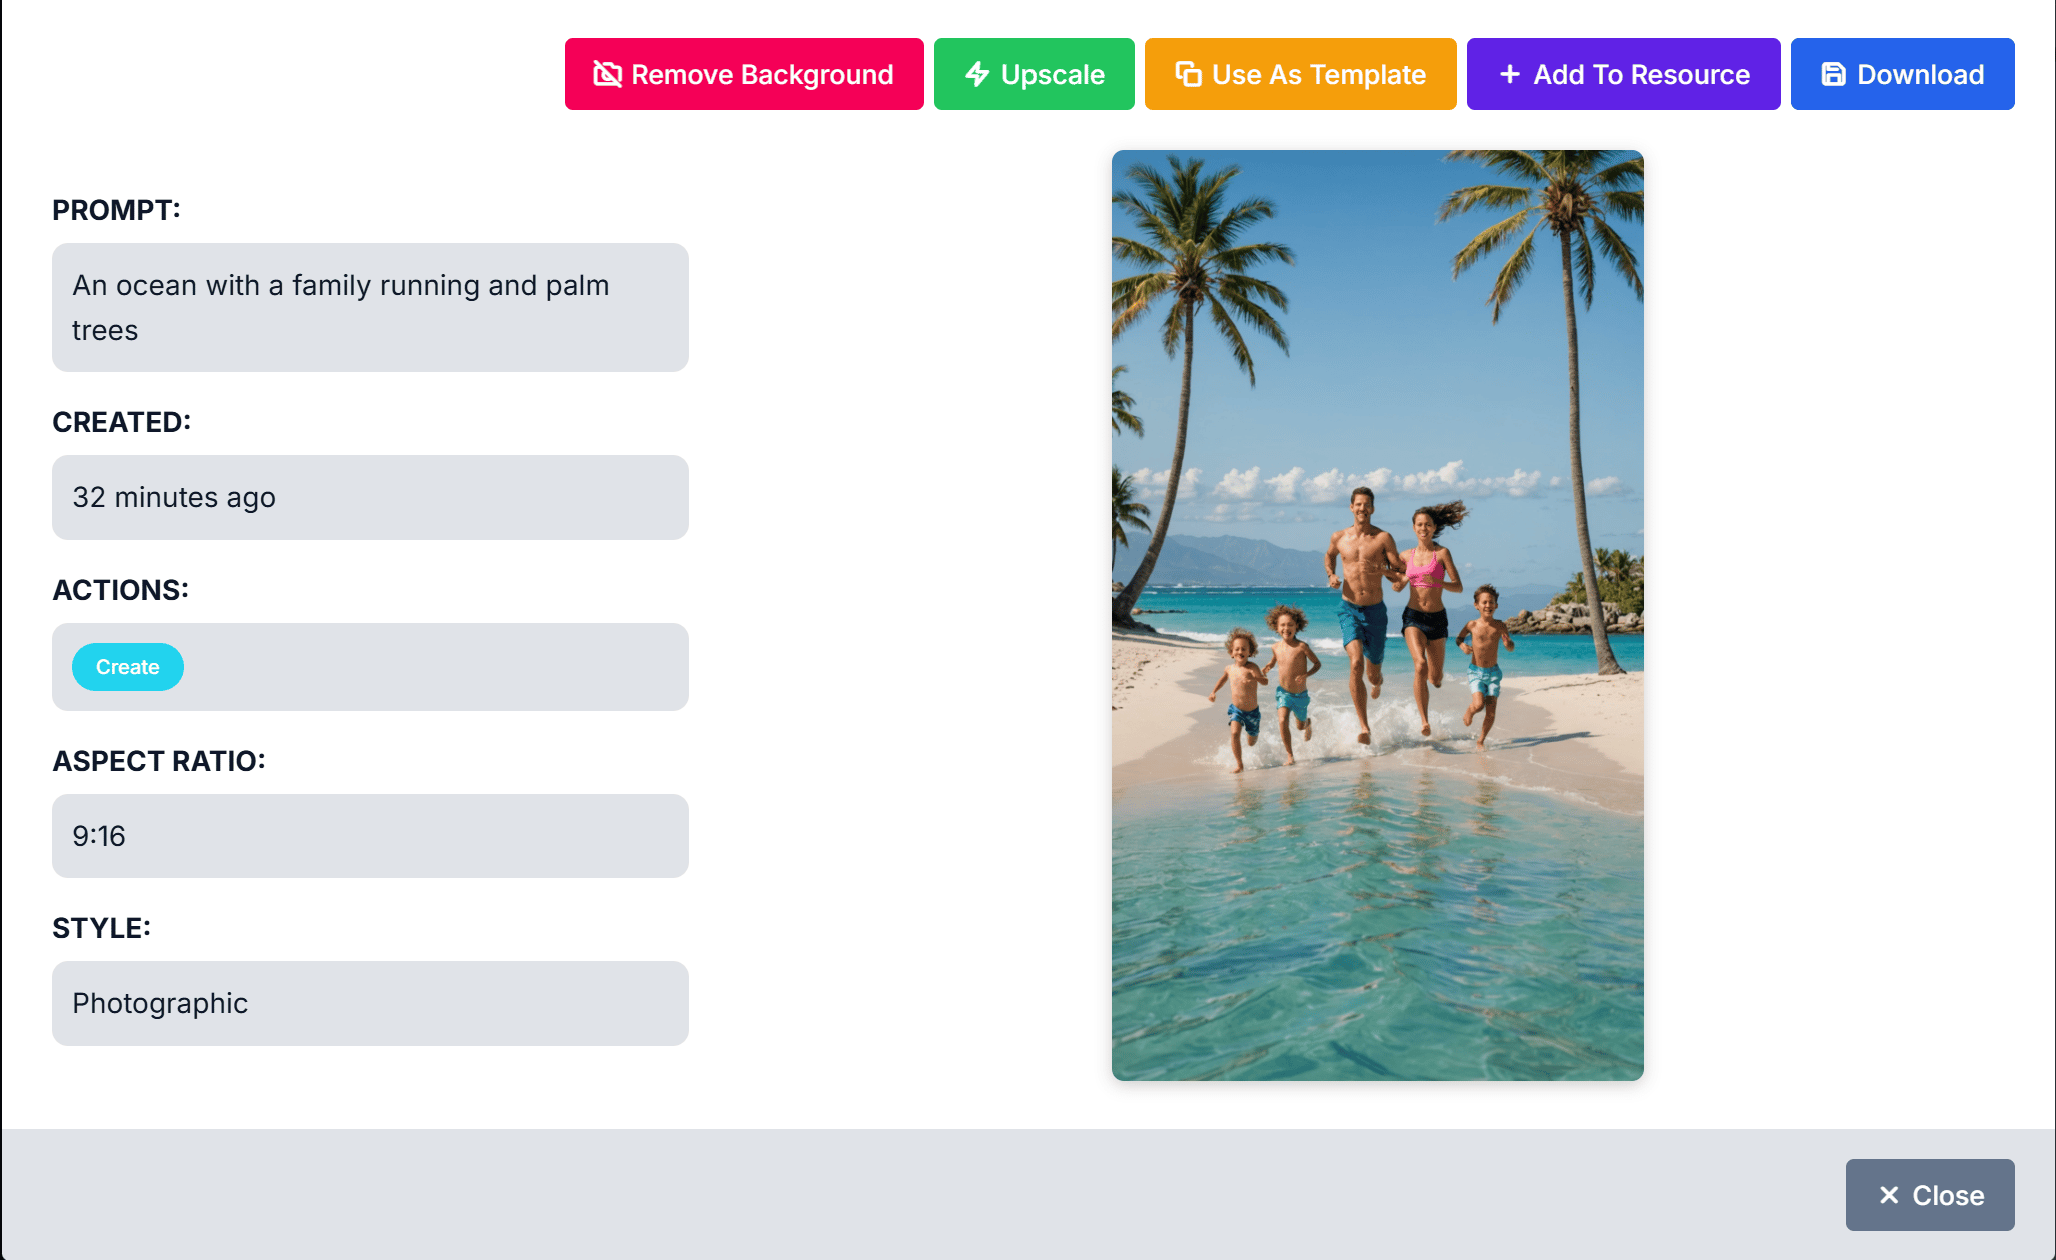
Once your image is created, you can make further adjustments. Please refer to the visual guide below.
## Editing Your Image
Once your image is created, you can make further adjustments. Please refer to the visual guide below.
 ## Editing Tools Explained
* ## Remove Background
Instantly removes the image background.
* ## Upscale
Improves image resolution and quality.
* ## Use as Template
Reopens the editor using the same prompt to create a new version.
* ## Add to Resource
Save the image as a Picture or Background for your customers to use.
* ## Download
Save the image to your device.
* ## Image Details
Displays information about the image style and settings used.
If you have any questions, suggestions, feedback, or need assistance with this feature, please feel free to reach out to us at **[support@pitchprint.com](mailto:support@pitchprint.com)**. We’re always happy to help.
We’re continuously working to improve and expand our tools to better support your creative needs. The **AI Studio** is just the beginning of what’s to come, and we’re excited to see how you use it to bring your ideas to life.
Stay tuned for future updates—and as always, thank you for being part of the PitchPrint community.
This documentation is built and hosted on [Mintlify](https://mintlify.com), a developer documentation platform.
## Editing Tools Explained
* ## Remove Background
Instantly removes the image background.
* ## Upscale
Improves image resolution and quality.
* ## Use as Template
Reopens the editor using the same prompt to create a new version.
* ## Add to Resource
Save the image as a Picture or Background for your customers to use.
* ## Download
Save the image to your device.
* ## Image Details
Displays information about the image style and settings used.
If you have any questions, suggestions, feedback, or need assistance with this feature, please feel free to reach out to us at **[support@pitchprint.com](mailto:support@pitchprint.com)**. We’re always happy to help.
We’re continuously working to improve and expand our tools to better support your creative needs. The **AI Studio** is just the beginning of what’s to come, and we’re excited to see how you use it to bring your ideas to life.
Stay tuned for future updates—and as always, thank you for being part of the PitchPrint community.
This documentation is built and hosted on [Mintlify](https://mintlify.com), a developer documentation platform.